Perform a test
Caution
Risk of injury!
The impact hammer or T-handle may cause injury when they drop during a test.
When the countdown is displayed in the control panel, keep a distance of 1 ft (0.3 m) away from the device until the impact hammer has dropped.
When the impact test is set up with the appropriate user and field selected, you can begin testing.
| ► | See "Set up a test". |
To perform the impact test, do the following:
-
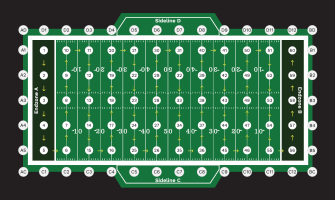
In the Set Location screen, select the STRIKE testing location where you are performing the test.
Use the map affixed to the control box to identify the correct location number.
Tip
Identify Endzones A and B prior to testing. This will determine the direction in which STRIKE testing occurs.
STRIKE testing locations
-
Select Confirm.
The Arm Handle screen is displayed, with options to Start or Cancel the test.
-
Remove the pin from the drop cap and insert it into the slot in the carrying handle.
-
Raise the T-handle and twist it clockwise to secure it in the drop track.
-
In the Arm Handle screen, select Start.
The control panel displays a 3-second countdown, then the impact hammer drops.
After the drop, the Results screen displays the following:
-
Peak g: surface hardness
-
dV: change in velocity (or "bounce back")
-
dZ: displacement
-
-
Select Continue.
The device performs a QC check, and returns either a successful or failing result.
► See "QC Check Fail" If the QC check is successful, the control panel prompts you to enter either the Moisture content measurement or Infill depth, depending on the testing surface.
-
Turn the rotary knob to enter a higher or lower value then select Confirm.
The Set Location screen is displayed, showing the next testing location. Move to the next testing location and repeat this process from step 1.

Tip
If there is a check mark displayed next to the testing location, the test has been completed successfully.
If there is an exclamation mark displayed, repeat the test.